You can denormalize a NoSQL database model using the Denormalization feature in erwin Data Modeler. Using the denormalization options, you can merge the objects in the source models into the target based on the requirements. Also, you can denormalize a model when you derive a new model or change the existing model.
The objects that you can denormalize differ based the type of the NoSQL database model. Refer to the following table for the list of supported databases, objects, and its name mappings for denormalization.
|
Database |
Object Names |
|---|---|
|
Amazon Keyspaces |
Tables, Columns |
|
Avro |
Documents, Fields |
|
Cassandra |
Tables, Columns |
|
Couchbase |
Tables, Items |
|
DynamoDB |
Tables, Items |
|
Google BigQuery |
Tables, Columns |
|
JSON |
JSON Objects, Fields |
|
MongoDB |
Collections, Fields |
|
Parquet |
Records, Fields |
This topic walks you through the denormalization options for Cassandara model. Similarly, you can denormalize other supported NoSQL database models using the Denormalization Wizard.
To denormalize a model, follow these steps:
-
Open a non-relational model in erwin Data Modeler.
-
On the ribbon, click Action > Denormalization.
The Denormalization Wizard appears.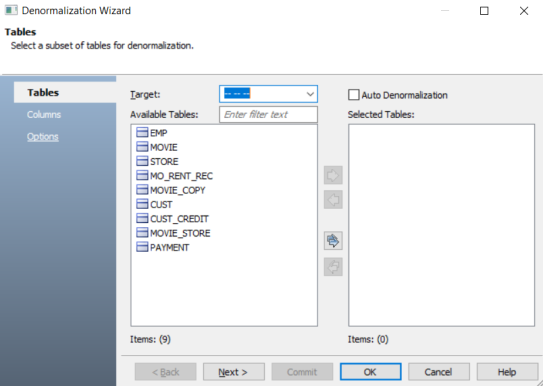
-
On the Tables section, click the Target drop-down to select a target table. All the tables will be merged into the selected target table.
Select Auto Denormalization option to merge tables with the target automatically. This embeds the tables in the model with one-to-one relationships as User Defined Type and one-to-many relationships as normal columns.
-
Under Available Tables, select one or more tables to merge. Then, click
 .
.
This moves the selected tables under Selected Tables.

-
Click Next.
The Column section appears. It displays a list of available columns.
-
Under Available Columns, select the that you want to merge. Then, click
.
This moves the selected databases under Selected Columns.
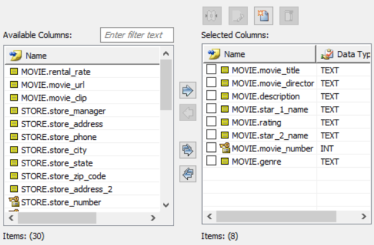
Once you have added the selected columns, you can use any of the following options:
- Merge (
 )
) -
Use this option to merge the selected columns and create a new column under Selected Columns.
- Update (
 )
) -
Use this option to edit column details such as column name, domain parent, and data type for a selected column.
- New (
 )
) -
Use this option to add a new column under Selected Columns.
- Delete (
 )
) -
Use this option to delete the selected columns.
- Merge (
-
Click Next.
The Options section appears. -
Select an Embedding Type.
You can select the following embedding options:
-
Embed as Auto: Use this option to embed tables through an auto-mechanism based on one-to-many and one-to-one relationships.
-
Embed as Normal: Use this option to embed collections using normal column styles.
-
Embed as UDT: Use this option to embed collections using a User Defined Type (UDT) styles.
-
-
Select Relationships option to include table relationships to the model.
-
Select Cascading options to determine how multiple collections are merged into a single collection.
Use the following cascading options:-
All: Use this option to denormalize all relationship levels in a collection into a single collection.
-
Levels: Use this option to specify the number of levels up to which collections are denormalized into one collection. For example, if you set Level to 1, all the collections up to level 1 in the relationship hierarchy will be denormalized into a single collection.
-
Auto Cleanup: Use the option to delete the source collection after denormalization.
-
-
Click OK.
The denormalization process starts and displays objects based on the denormalization option.
Alternatively, you can click Commit to apply changes to the model without exiting the Denormalization Wizard.
|
Copyright © 2025 Quest Software, Inc. |